Monday, April 13, 2020

Week 10 - 10 Best process images


These models follow the same measurements but at different scales and utilise different themes to express a mood felt by the human scale figure inside. I've chosen these images as I believe they show my progression and improvement in using cardboard and paper for modelling a room or area that expresses moods or emotions.
These explore the capabilities of light in an area and the effects of shadow in a room. Also, the potential for Photoshop to maximise the storytelling capabilities of such effects. 

Scale - 1:10
24/3/20


Scale - 1:20
1/4/20


Scale - 1:1
7/4/20


Scale - 1:20
                                                                                    14/4/20


Scale - 1:20
7/4/20


Scale - 1:20
15/4/20

Scale - 1:20
25/4/20


Scale - 1:20
20/4/20
Scale - 1:20
22/4/20


Scale - 1:20
                                                                                    20/4/20


Week 9, 100 word expository statement draft and human figure testing

The statement will introduce the title of your project, the intent of your communication approach and then explain how you accomplished your objectives using an example of one of your projects. Use the “Expository Writing” format, as below:
1. Title:
2. Topic sentence (outlining the subject you will be examining)
3. Thesis (or statement you are trying to prove).
4. Argument (supported by 1 or more pieces of evidence or facts).
5. Conclusion (proving or disproving your thesis, it doesn’t matter which, be honest)

Title - Developing your style (z5312040 - Luka Heeraman)
My designs have taught me that my style can be moulded and communicated in a variety of different techniques. Model making allows an individual to create a story and reveal emotions and moods.
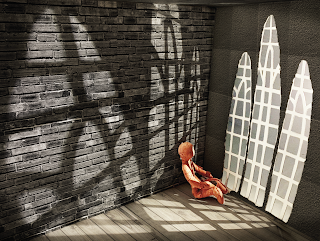
Thus, within my Week 7 model, a small-scaled human figure was pitched into a large room in front of a towering window to communicate the insignificance of the figure. Overall, my attempt at achieving this was successful but to an extent. Although the figure was well positioned in the corner, the figure was slightly too large, interrupting the effect of the insignificance of the individual. However, the magnified size of the shadow due to the lighting is powerful in making the figure seem more isolated.


During Week 9, I also attempted to try something new by focusing my photography solely on the human scale models that created. It was very interesting because although they are the same model, the positioning of the camera and model can create two different moods or emotions of the model. I also utilised photoshop to place my model in a totally new environment to further create the mood for which it was in.


Week 8 Activities

Fusion 360 materials
1st model
I tried 3 different material mix-ups with each test. 
With my first test, I used Semi-gloss Walnut and Oak Timber as I preferably enjoy working with Timber and making furniture. Also, I added a mirror material to the inside of the shape as it was a nice contrast with the wooden textured outside.


2nd model
With my second model, I tried to create an effect similar to that of Spiderman's suit. On his suit, the red material has a small square pattern, thus I used stainless steel mesh squares to create this effect. For the blue material, the pattern was more like circles, thus I used carbon fibre coloured blue to create the texture and look of his suit. Finally, the black lining was created using steel satin coloured black to mimic the black lining of Spiderman's suit.


3rd model
Finally, my third model was a mix of brighter pastel colours to suit the outdoor environment. I used generic leather coloured to a pastel pink, along with crystal coloured blue to mimic the birthstone topaz. Finally, I used a copper mesh applied to the inside of the model to create a metallic effect which worked well with the crystal and leather textures.

By applying the dry lake bed environment scene, had an interesting effect on the pastel pink by giving it a light blue tinge to the outside of the model as well as the copper mesh on the inside.


Photoshopping materials to Scaled model
Model 1
Beginning this task I really struggled to think of ideas of what type of lighting/shadow effect I could implement, so I started simple with a plain beam of light shining on the human figure which created an interesting focus on the figure.

The original photo focuses a soft circled light onto a scaled figure laying on the floor, almost seeming like a UFO beam is shining on them. Another interesting technique was testing different lights, the first images uses a phone torch. This is much creates a hard bold circle of light which looks somewhat unnatural. While the soft circle light looks a bit more realistic and creates a dramatic effect .

The photoshopped image features wooden walls and a stone tile floor, establishing a cold, isolated setting for the model as they point to some mysterious object is shining the light on to it.
I then tried editing the exterior of the house in an outside environment, it is not my best work as I really struggled to find images and work with the technology to get the perspective I was looking for. however, I believe I achieved the basis of the task.


Model 2 
For this model, I attempted to create a tall room with a large towering window with a spooky vibe to it. I took inspiration from the old mansion in the "Edward Scissorhands" movie. I found the pattern of the window was very interesting and wanted to test its shadow possibilities in my own model. Thus it was used to create a mood of isolation from the world, just like Edward in the film.


Week 7 Studio activities

 2.5D initials - Luka Rhys Heeraman
Using Fusion 360 for this particular activity was quite difficult due to the shapes of letters which I was using. I often found that the shape was unable to form because of the lines intersecting. In the end, was able to get a thickness of 2 mm for my model.


Fusion 360 Prism shape


Iterative Model with an additional source of natural light at a new scale

In my new models, I attempted to create my room on a 1:20 scale as opposed to my first cardboard 1:10 model. I struggled to find something that suited my style without copying other ideas from Pinterest. 
At first, I wanted to create an effect where the person was in an outside environment even though they were inside, hence the use of snowflakes. However, this was quite difficult with the light source I made.
1st Model

 I then opted for something more simple and simply shone a beam of light on my scaled figure to mimic a ufo abducting someone or spotlight shining on someone. To do this, I cut a hole in the ceiling and created a paper tube to focus the light onto the figure. In this image, the lighting was created with a phone torch, however, the light was too bright and focused for my liking.
Therefore, in this image, rather than the torch, I simply used the light of the phone screen with created a blurred edge around the light rather than a clean circle.

2nd Model
For my second model, I returned to my space themed ideal room. Originally there was an issue with lighting in the room due to the blinds. To fix this, I cut some of the lines out to make bigger slits and thus allow more light in.

More light was able to enter the room, however, it was still difficult to see the galaxy pattern inside the room. But overall, the lighting effect was much better inside the room compared to the first attempt

3rd Model
As a third attempt, I gained some inspiration from an image scene in one of my favourite movies 'Edward Scissorhands'. 
I noticed the large windows in the background and attempted to use this within my own model.


With air-dried clay, I created a scaled model of an individual in the room, however, the model isn't to perfect scale as a smaller human was difficult to make with the small parts. I believe the shadow created from the window, however, did create the effect of a smaller individual within a large room somewhat isolated within a corner.